Development
The Morningstar Design System team follows a well-defined process for designing, building, and documenting visual language, components, and other patterns.
The process to build components, visual language, and other concerns follows some or all of four steps. Typically, a system feature – a new card component, for example, or an additional button variation – involves pairing a designer and an engineer. While a designer completes DESIGN and an engineer completes BUILD, either may complete the DOC and PUBLISH steps.
| Step | Complete When | Owner | Reviewers |
|---|---|---|---|
| DESIGN | Design has completed and sufficiently documented a range of variations, states, and other design properties. | Designer |
MD Design * Director Design * Paired Engineer * System Lead Other Designer |
| BUILD | Front-end assets – HTML, CSS, and JS – are complete for all variations, states, and variables, and sink page(s) have passed Build QA. | Engineer |
Paired Designer * Other Engineer * System Lead |
| DOC | Documentation copy, images, and code samples are complete and have passed Doc QA. | Designer OR Engineer |
Paired Designer OR Engineer * Other Designer OR Engineer * System Editor * System Lead |
| PUBLISH | Documentation has been migrated into publishable pages, verified, and merged with built features from the feature branch into the release branch. | Engineer OR Designer | The other person |
* indicates required reviewer
Step 1: Design
The DESIGN task includes finalizing all design decisions of a UI element or other design consideration. This includes not just directional validation from the design community, but meticulously solving for variations, states, and other relevant design details.
Process
- Signify a DESIGN task in JIRA by appending [Design] to the end of the task title.
- Create design concepts in Sketch (preferred), Adobe Photoshop, or Adobe Illustrator.
- Emerging designs must be shared via critique with design communities for both Institutional and Consumer products, as well as at least one MDS team critique.
- The DESIGN task is complete when all reviews are concluded and dev-ready design artifacts have been delivered to an assigned engineer.
Reviews
To complete a DESIGN task, the designer must obtain approval from:
- Managing Director (required)
- Design Director (at least one required)
- Engineer assigned to build the design when relevant (required)
- System Lead (recommended)
- Additional designer on the MDS team (recommended)
Step 2: Build
The BUILD task includes the development and QA of MDS code, including library items, visual language, and other tooling.
Process
- Signify a BUILD task in JIRA by appending [Build] to the end of the task title.
- Create a new feature branch from the develop branch.
- Label feature branch as
feature/MDS-###-[label], such asfeature/MDS-219-Split Button. - Build the solution on a sink page in the
/library/test/visual/componentsdirectory, with a filename corresponding to the component, such asbuttons.njk. - The assigned engineer conducts Component QA independently prior to creating a pull request for review including visual diffing tests.
- To trigger review, create a pull request of the
feature/MDS-###-[label]branch against the develop branch and assign reviewers to the pull request. - The BUILD process concludes when a feature branch is merged into the develop branch.
Running the Local Environment
The MDS repository contains two primary local environments, the library and the doc-site. When building new components or updating existing components, the work will be done in library. When publishing documentation the work will be done in doc-site.
Refer to the README files in library and doc-site for specific instructions on how to run those projects locally for development.
Generating new component files in library
When building a new component in library there is a helper task that can generate the boilerplate files you'll need build the component.
From library run gulp generate:new-component. Follow the prompts by providing the singular name of the component, and answering "no" when asked if a JavaScript file should be generated.
If you enter "data table" when prompted for a component name, this helper task will generate the following files:
library/components/data_table/data_table.njk

library/components/data_table/data_table.scss

library/test/visual/test-pages/components/data-tables.njk
The helper task will automatically pluralize and hyphenate the test page since it becomes a URL path in the library project. The .scss and .njk templates are kept singular and underscored.
Building a new component
Components are built using SCSS for the styles and Nunjucks as the HTML templating language.
In the components/**/*.njk file you generated in the previous step you will author a Nunjucks macro that will allow the quick creation of multiple versions of your component.
The test/visual/test-pages/components/*.njk file is the test area where you will call the nunjucks macro multiple times, exercising all the variations of your component.
Visual Diffing
The MDS development environment contains visual diffing tests built on the BackstopJS testing framework.
Testing Requirements
The visual diffing tests require Docker Community Edition (Free) version 17.12 or higher. You must install Docker prior to running the tests.
When to Test
- Before submitting a pull request to the
developbranch to ensure that no components are unintentionally changed. - Prior to each release for quality assurance.
Creating Tests
To create a test, wrap sections of a component sink page with a special nunjucks component:
{% call test_row() %}
    <h2 class="mds-doc-sink__header">Default</h2>
    {{ library.list_group() }}
{% endcall %}
Everything within the test_row() call will be captured as a new image and used to create a new test.
Running Tests
The testing functionality is exposed via two gulp commands:
gulp test:styles— runs the tests.gulp test:styles-promote-differences— promotes the latest test images as the new baseline for subsequent tests.
Run gulp test:styles from the command line to run tests. Testing can take 10–15 minutes depending on the speed of your computer. Once a test is complete, the results will display in your browser.
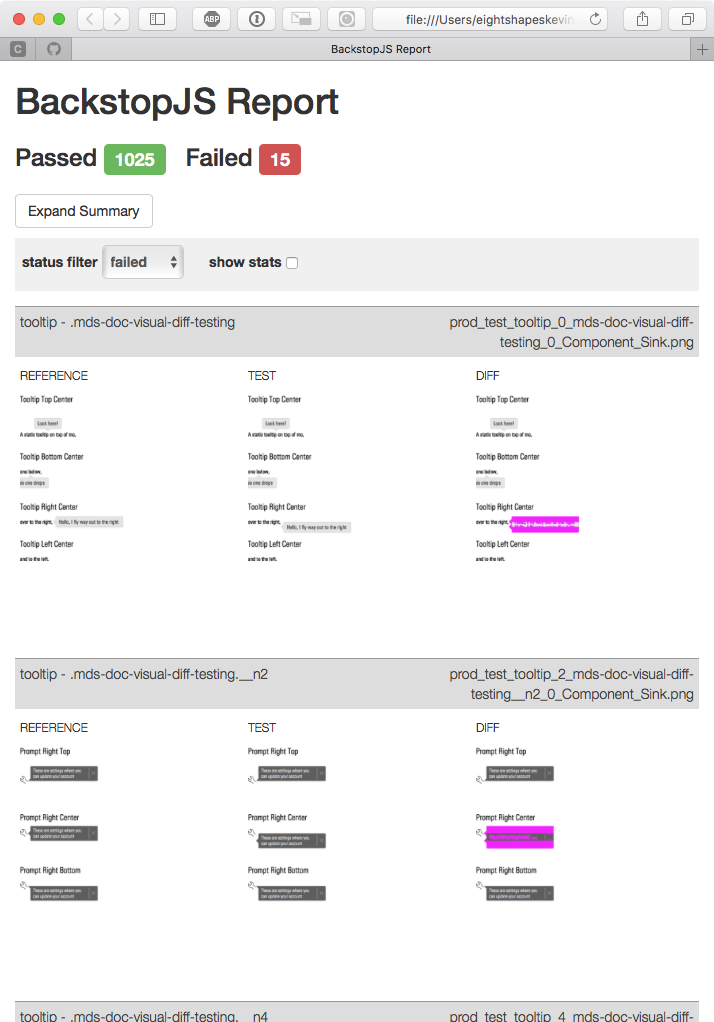 Test Results Report
Assessing ”Failed“ Tests
A visual diffing test can “fail” in two ways:
- Expected failures serve as confirmation that changes made to MDS source code altered a component’s display in an expected manner.
- Unexpected failures reveal unintended changes incompatible with your intent. If a test reveals unexpected changes, correct the code and rerun the test until you experience no incompatibilities.
Promoting Expected Differences
Run gulp test:styles-promote-differences to promote the latest test’s screenshots as the new baseline screenshots for future tests. This tells the testing framework, “These changes are approved. Don’t flag them as failures anymore.”
Commit the new baseline images to the MDS repository along with the code changes that triggered the visual difference.
Reviews
To complete a BUILD task, the engineer must:
- Request review from the assigned designer and at least one MDS engineer in both the pull request and individual sub-tasks on the JIRA task per reviewer.
- Mark the task as complete when all reviews are complete and the pull request has been merged.
Step 3: Doc
The DOC task corresponds to authoring any content that communicates what the System provides and how it operates. This includes copy, imagery, and coded examples illustrating the System via component documentation, processes, and any other content useful within or beyond the MDS core team. The DOC task is typically completed by either the assigned designer or engineer for that item.
Process
- Signify a DOC task in JIRA by appending [Doc] to the end of the task title.
- Write guidelines, reference tables, and other copy to be published on the system site within a Google Docs document in the team’s
/Components/shared drive location, whereMDS-###corresponds to the DOC JIRA task number. - Create supplemental content imagery (such as a Do or Don’t PNGs) in the
/Components/MDS-###/Images/Google Docs shared drive location. - For code samples to be revealed in example/code pairs, begin work on the documentation page at
doc-site/components/[plural-component-name].njkthat’s finalized in the PUBLISH step. - The DOC task is complete when all reviews are complete and examples and artwork are placed in the proper locations.
Reviews
To complete a DOC task, the author must obtain approval from:
- The partnering designer or engineer, depending on who designed and built the part.
- Another designer or engineer on the MDS core team.
- The assigned system editor, who provides both a technical (content accuracy and relevance) and editorial (tone and style) review of what's written.
Step 4: Publish
The PUBLISH step migrates content – copy, imagery, code examples, etc. – authored during the DOC step to the system site.
Process
- Integrate copy, images, and code samples into the documentation page at
doc-site/components/[plural-component-name].njk. - To trigger review, create a pull request of the
feature/MDS-###-[label]branch into the current develop branch as well as JIRA subtasks for each assigned reviewer. - The PUBLISH process concludes when a feature branch is merged into the develop branch.
Reviews
To complete a PUBLISH task, the publisher must obtain approval from:
- A designer or engineer on the MDS core team.
Releases
The Morningstar Design System will publish two main artifacts: the documentation site and the consumable library for application engineers.
Library Release
- All releases will be downloadable from the documentation site as zip files.
- Releases are also available as NPM packages
- For more detailed release information, please see the wiki article (Internal Use Only).
Documentation Release
- The production S3 environment will be accessible from designsystem.morningstar.com.
- This URL is cached by a cloudfront distribution.
FAQ
What’s the Morningstar Design System’s stance on JavaScript?
MDS does not provide JavaScript with UI Components.
JavaScript examples in MDS documentation are for demonstration purposes only. The Morningstar Design System team cannot provide technical support for JavaScript-based issues.
All component markup and styles provided are intended for production use, and the MDS core team expects that any JavaScript necessary to create or manipulate components will be provided by product teams.
Can I use Bower?
Bower is no longer supported as a dependency manager. We support NPM as a package manager.
I've seen doc_library and library namespaces when running the doc-site environment. What's the difference between doc-library and library?
The doc-site uses the same UI Component library NPM dependency that other consumers of MDS rely on.
Because the doc-site is built using Nunjucks the nunjucks macros from library are referenced through the NPM package. All of those components are mapped to a namespace called library in doc-site's base template.
Whenever you see library.button() or library.list_group() macro call in doc-site, it's referencing the components from the official MDS UI Component library.
doc_library is the namespace for components that are built as part of the doc-site that aren't part of the official MDS UI Component library. These components include things like code_snippet, component_explorer, and icon_swatch.
The doc_library nunjucks macros are not published or intended for usage outside of the doc-site.
What 3rd party JavaScript libraries does the Morningstar Design System use?
You can find all the external dependencies with the corresponding versioning here.